Why do hanging leg raises?
Hanging leg raises (suspended leg raises) are the advanced version of floor leg raises. Hanging from a bar, you raise your straight legs to horizontal or higher while keeping your body stable. It is one of the most demanding ab exercises in calisthenics.
The major advantage? Suspension eliminates all support. Your core must not only lift your legs but also stabilize your entire body hanging in the air. The result: maximum abdominal intensity and powerful dynamic bracing.
This exercise primarily targets the rectus abdominis, especially its lower portion. The obliques and transverse abdominis work as stabilizers to prevent pelvic rotation. Your hip flexors are heavily involved, while your lats and serratus anterior contract to keep your shoulders stable.
In calisthenics, this exercise is a mandatory step. You place it after mastering floor leg raises and before tackling the dragon flag. Hanging leg raises develop the core bracing strength needed for advanced skills like the front lever.
Strength prerequisites for hanging leg raises
Before you hang from a bar for leg raises, your core strength and grip must be solid. No shortcuts here.
Prerequisite number 1: master 4 sets of 15 reps of floor leg raises with straight legs and full range of motion. If you struggle with floor leg raises, the suspended version will be overwhelming.
Prerequisite number 2: hold a passive dead hang for at least 45 seconds without shaking. Your shoulders must stay engaged and stable, not completely relaxed. This is the foundation for controlling your body while suspended.
Prerequisite number 3: complete 10 reps of hanging knee raises (bent knees) with zero body swing. If your body sways like a pendulum, your bracing strength is insufficient.
Shoulder strength test: perform 5 clean scapular pull-ups. This exercise develops the scapular depression needed to stabilize your shoulders during hanging leg raises.
If you pass all four tests, you are ready for the straight-leg suspended version.
How to do hanging leg raises: step-by-step technique
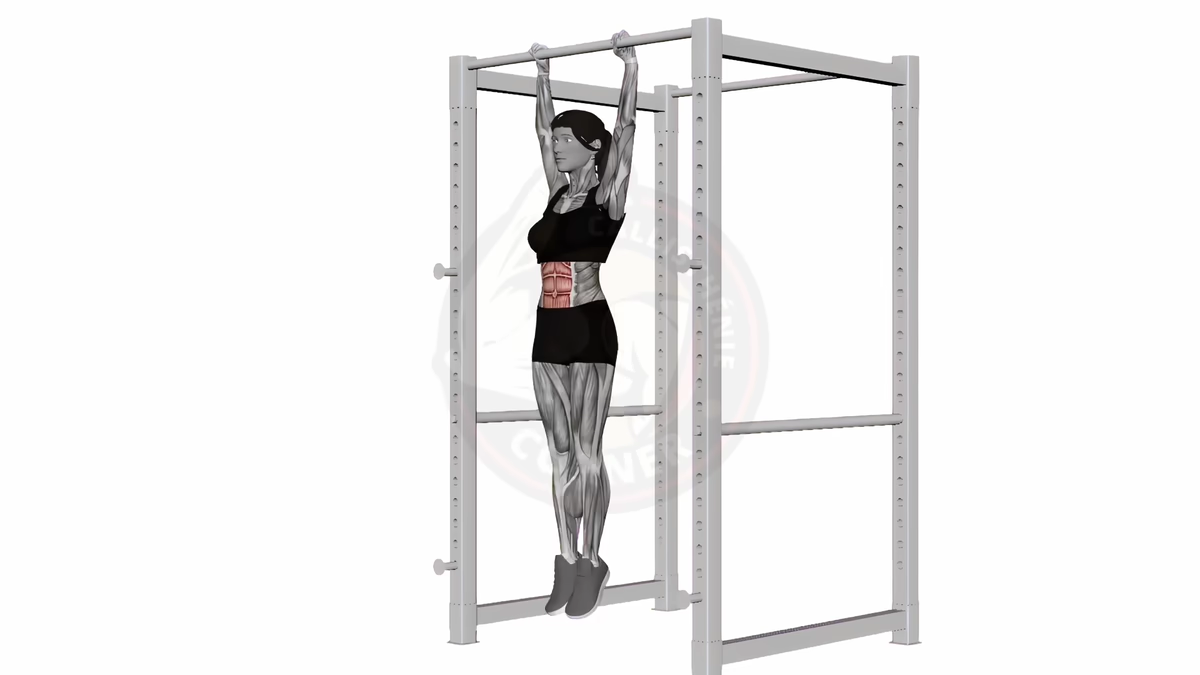
Step 1: Starting position
Hang from a pull-up bar with an overhand grip (palms facing forward), hands slightly wider than shoulder-width. Arms fully extended, no elbow bend.
Engage your shoulders by pulling your shoulder blades slightly downward (scapular depression). Your shoulders should not ride up toward your ears. This position activates your lats and protects your joints.
Legs straight, feet together, positioned slightly in front of your body (not hanging straight down). This slight forward angle maintains constant tension in your abs even at the bottom position.
Step 2: Lifting phase
Exhale deeply and contract your abs. Raise your straight legs forward, keeping your knees locked. Focus on the pelvic tilt: this is not just a leg lift, it is a posterior rotation of your pelvis.
Raise your legs until they are at least parallel to the floor (90 degrees relative to your torso). Advanced practitioners can go all the way up to touch the bar with their feet (toes to bar), but reaching horizontal is enough for maximum abdominal work.
Throughout the lift, your body must remain stable. Zero swinging. If you oscillate, you are using momentum instead of pure ab strength.
Tempo: 2 seconds for a controlled ascent.
Step 3: Lowering phase
Inhale and lower your legs in an ultra-controlled manner. This is where most people fail. The descent must be as controlled as the ascent, without letting your legs drop.
Lower to the starting position (legs slightly in front of vertical), not to a complete dead hang. This residual tension keeps your abs under constant contraction.
Tempo: 3 seconds to lower. Eccentric control is what builds your abdominal strength.
Critical technique points: your arms stay fully extended from start to finish. Your shoulders remain depressed (shoulder blades pulled down). No pendulum motion at all. If your body starts swinging, stop, stabilize, then resume.
Mistakes to avoid
Body swinging like a pendulum. The number one error. You use momentum to lift your legs instead of contracting your abs. Result: zero abdominal work, shoulder injury risk. Fix: slow down the movement drastically. If you cannot lift without swinging, bend your knees (hanging knee raises) until you develop the necessary strength. Quality over quantity.
Shoulders riding up toward the ears. In the hanging position, your shoulders relax completely and rise. This deactivates your lats and compromises your joints. Fix: actively engage your shoulder blades by pulling them down before every rep. Think “shoulders away from ears” throughout the movement. Scapular pull-ups are the ideal corrective exercise.
Bent legs instead of straight. You bend your knees to make the movement easier. That is compensating. Hanging knee raises are a progression, not the final version. Fix: if you cannot keep your legs straight, you are not ready yet. Go back to floor leg raises or hanging knee raises until you develop sufficient strength.
Insufficient range of motion. Your legs only reach 45 degrees instead of horizontal. You are cutting the movement short and limiting ab work. Fix: aim for horizontal at minimum. If you cannot reach it, reduce the rep count but demand full range. 5 complete reps are worth more than 15 partial reps.
Uncontrolled descent. You let your legs fall freely. This creates swinging and eliminates the eccentric phase. Fix: mentally count 3 seconds for every descent. Actively brake with your abs. If you no longer have the strength to control the descent, your set is over.
8-week training program for powerful suspended abs
Here is an 8-week program to progress from hanging knee raises to mastered hanging leg raises. Integrate it 2-3 times per week into your ab sessions or at the end of your workouts.
Weeks 1-2: adapting to suspension
- 2-3 sessions per week
- 3 sets x 8-10 reps of hanging knee raises (bent knees)
- 90 seconds rest between sets
- Goal: zero body swing, shoulders engaged throughout every set
Weeks 3-4: transition to semi-straight legs
- 3 sessions per week
- 4 sets x 6-8 reps with slightly bent knees (15-20 degrees)
- 2 minutes rest between sets
- Goal: reach horizontal with semi-bent knees, controlled 3-second descent
Weeks 5-6: full range straight legs
- 3 sessions per week
- 3 sets x 5-8 reps with completely straight legs
- 2-3 minutes rest between sets
- Goal: straight legs to horizontal minimum, 2-2-3 tempo (up-pause-down)
Weeks 7-8: intensification and volume
- 3 sessions per week
- 4 sets x 8-12 reps straight legs with 1-second pause at the top
- 90 seconds rest between sets
- Goal: 4 sets of 12 clean reps, perfectly stable body, zero swing
Facilitation tip: if you struggle during weeks 5-6, alternate one straight-leg rep with one bent-knee rep within the same set. This lets you maintain volume while progressively building the strength needed for the full version.
Variants and progressions
Once you have mastered the standard hanging leg raises, here is how to keep progressing.
Easier variant: captain’s chair leg raises
Use a Roman chair (captain’s chair) to rest your forearms. This eliminates the grip constraint and lets you focus exclusively on the abdominal work. Perfect if grip strength is limiting your performance.
Standard variant: hanging leg raises to horizontal
The version described in this article. Straight legs to horizontal (90 degrees), controlled descent. Target: 4 sets of 12 clean reps.
Advanced variant: toes to bar
Raise your legs until your feet touch the bar. The range of motion increases dramatically, as does the intensity. Requires hamstring flexibility and exceptional abdominal strength.
Slow tempo variant: 3-2-3
3 seconds up, 2 seconds of contracted pause at horizontal, 3 seconds down. The time under tension is extreme. Your abs get no rest. Reserved for experienced practitioners.
Weighted variant
Attach a small weight (2-5 kg) to your ankles or hold a medicine ball between your feet. Start light and increase gradually. Only appropriate if you can easily complete 4 sets of 15 reps at bodyweight.
Rotation variant: windshield wipers
Raise your legs to horizontal, then rotate them laterally from left to right like a windshield wiper. Intensely targets the obliques. A very advanced exercise.
What comes after hanging leg raises?
Once you can complete 4 sets of 12 reps with straight legs, controlled tempo, and a stable body, you are ready for the next level.
Dragon flag: the complete core bracing exercise. Lying on a bench, you hold your entire body rigid while supporting yourself only on your shoulders. Hanging leg raises develop exactly the strength and core control needed to tackle this legendary movement.
Front lever: an iconic calisthenics skill. Hanging from the bar, body horizontal facing the ground, arms straight. Hanging leg raises build the dynamic bracing and pulling strength essential for progressing toward this hold.
Full integration into a complete program: combine hanging leg raises with rotation exercises like russian twists, isometric bracing like the hollow hold, and flexion exercises like crunches. Your core will become unbreakable.
Hanging leg raises are not just an advanced ab exercise. They are a test of total functional strength: bracing, grip, shoulder stability. Master them with flawless technique, and you lay the solid foundation for the most impressive movements in calisthenics.
Frequently Asked Questions
Are hanging leg raises the best ab exercise?
Hanging leg raises are one of the most effective ab exercises because they load the rectus abdominis through a full range of motion while eliminating external support. The suspended position forces your core to stabilize your entire body, which standard floor exercises cannot replicate. For overall abdominal development, combining them with isometric holds like the hollow hold and rotational work gives the best results.
How many hanging leg raises should I do?
Start with 3 sets of 5 to 8 reps with straight legs and controlled tempo (2 seconds up, 3 seconds down). Once you can complete 4 sets of 12 reps with zero body swing and full range of motion, you are ready to progress to harder variants like toes-to-bar or weighted raises.
What is the difference between hanging leg raises and knee raises?
Hanging knee raises use bent legs, which shortens the lever arm and significantly reduces the load on your abs. Hanging leg raises require straight legs, increasing the difficulty and abdominal engagement. Knee raises are the recommended starting point for building the strength needed for the straight-leg version.
Can beginners do hanging leg raises?
Most beginners lack the core strength and grip endurance for strict hanging leg raises with straight legs. Start with hanging knee raises instead, and build up to 3 sets of 12 clean reps with no body swing. Once you pass that milestone plus a 45-second dead hang, you can begin transitioning to the straight-leg version.
Do hanging leg raises work the lower abs?
Yes. Hanging leg raises are one of the best exercises for targeting the lower portion of the rectus abdominis. The key is to focus on posterior pelvic tilt (curling your pelvis upward) rather than simply lifting your legs. Without that pelvic tilt, the hip flexors take over and the lower abs get less stimulation.