The dead bug is a dynamic core exercise that comes from physiotherapy and rehabilitation. Originally used to help patients recover from back injuries, it has become a staple in strength training, calisthenics and athletic preparation. The exercise involves extending opposite arm and leg while lying on your back, all while keeping your spine perfectly stable.
If you’re looking for a way to build deep abdominal strength without crunches and without putting your lower back at risk, the dead bug is one of the best exercises available. It requires zero equipment, adapts to all fitness levels, and delivers results from the very first session.
What is the dead bug?
The name comes from the position: lying on your back with arms and legs raised, you look exactly like a bug flipped on its back. Behind the funny name is a seriously effective exercise.
The dead bug is a contralateral movement: you extend one arm and the opposite leg simultaneously while maintaining a braced, stable torso. This crossing pattern forces your core to resist rotation and extension, training the anti-movement function of your abs rather than just flexion.
Unlike crunches or sit-ups that compress the spine repeatedly, the dead bug keeps your back flat on the floor throughout the entire exercise. This makes it one of the safest and most effective core exercises for people of all levels, including those with a history of lower back pain.
Muscles worked
Transverse abdominis: The deepest layer of your abdominal wall. The dead bug is one of the most effective exercises for targeting this muscle, which acts as a natural corset around your trunk.
Rectus abdominis: Your “six-pack” muscles work to maintain trunk stability as your limbs move away from your center of gravity.
Obliques: Both internal and external obliques fire to prevent rotation as you extend opposite arm and leg. This anti-rotation demand is what makes the dead bug so functional.
Trunk and pelvis stabilizers: The muscles surrounding your spine and pelvis work continuously to maintain a neutral position. This includes the multifidus, pelvic floor and hip stabilizers.
Who is the dead bug for?
Complete beginners: The dead bug is one of the most accessible core exercises. If you’re just getting started with calisthenics, it builds the foundational strength and body awareness you need before progressing to more demanding exercises.
People with lower back pain: Because your back stays pressed into the floor throughout the movement, there is minimal spinal load. Physiotherapists regularly prescribe the dead bug for patients recovering from back injuries or dealing with chronic lower back discomfort.
Athletes looking for better coordination: The contralateral pattern (opposite arm and leg) develops coordination between your upper and lower body. This transfers directly to running, swimming, martial arts and any sport that requires integrated movement.
Anyone at any level: No equipment, no prerequisite strength, and a movement pattern that scales easily through tempo, range of motion and added resistance.
Benefits of the dead bug
Deep core reinforcement: The dead bug targets the muscles that most core exercises miss. The transverse abdominis and deep stabilizers get a focused workout that builds the kind of core strength you can actually feel in everyday movements: carrying groceries, standing for long periods, playing with your kids.
Stability and posture improvement: Training your core to resist movement (anti-extension, anti-rotation) improves your posture more effectively than exercises that only create movement. A strong, stable trunk translates to better alignment throughout the day.
Back pain prevention: By strengthening the muscles that support and protect the spine without compressing it, the dead bug is one of the most effective exercises for preventing lower back pain. If you sit at a desk all day, this exercise counteracts the damage.
Safe alternative to crunches: Crunches and sit-ups repeatedly flex the spine under load. Over time, this can contribute to disc issues and chronic back pain. The dead bug delivers superior abdominal activation without any of that risk.
How to do the dead bug: step by step
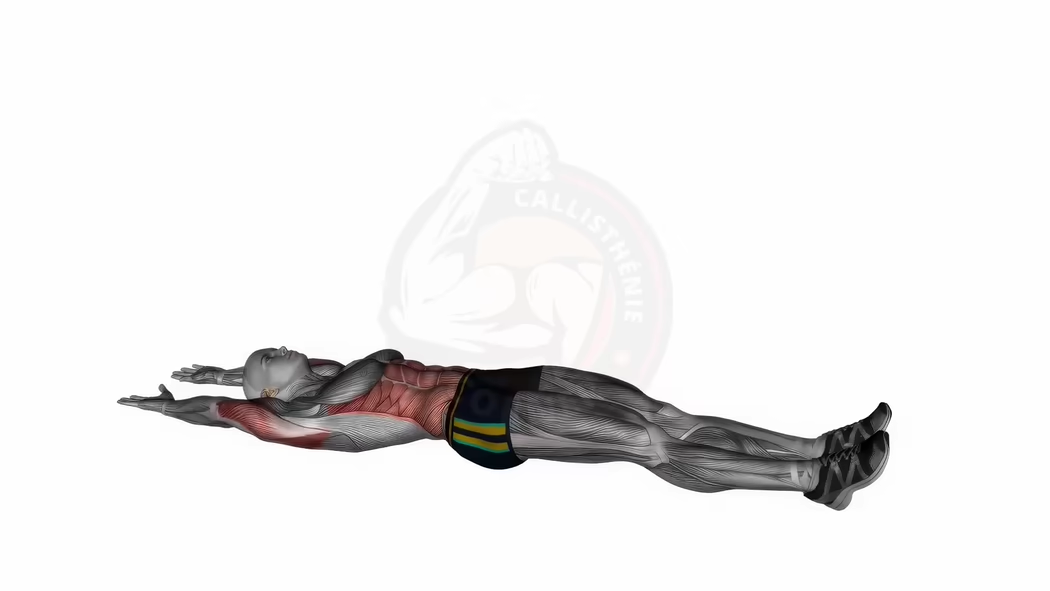
Step 1: Starting position
Lie on your back on a mat. Raise your arms straight toward the ceiling, directly above your shoulders. Lift your legs with knees bent at 90 degrees, so your shins are parallel to the floor. Your lower back must be firmly pressed into the floor. This is the critical detail. If you can slide a hand between your lower back and the floor, press down harder.
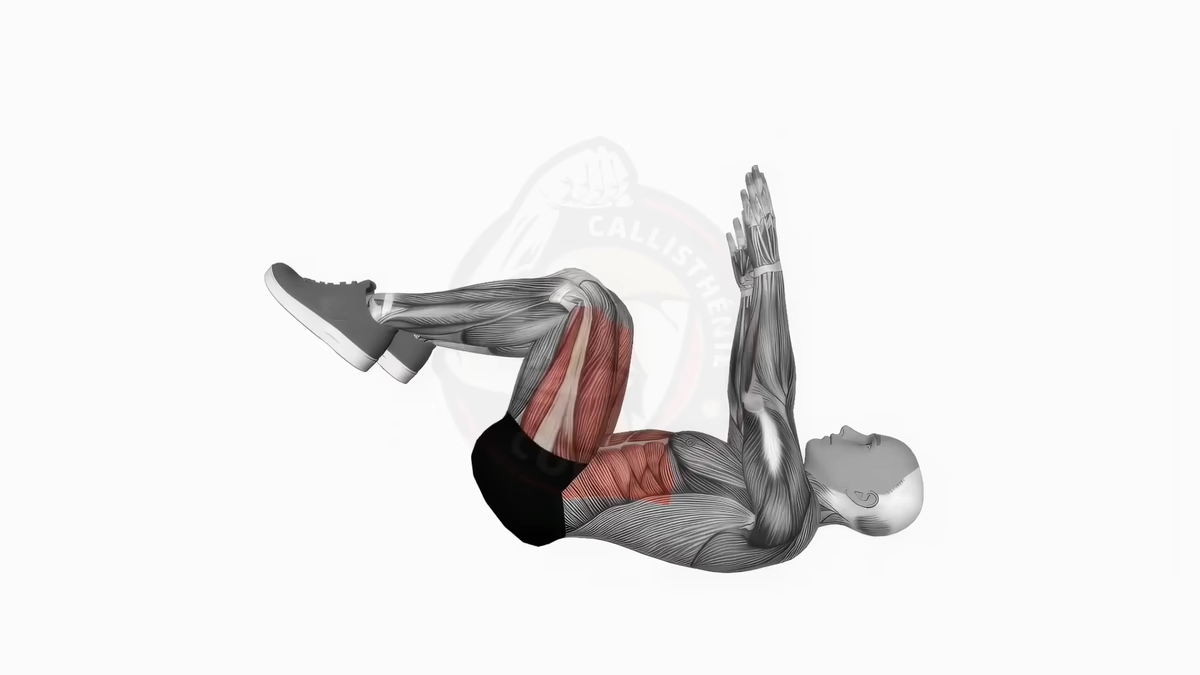
Step 2: Extend opposite arm and leg
Slowly lower your right arm overhead (toward the floor behind you) while simultaneously extending your left leg straight out (toward the floor in front of you). Both limbs hover just above the floor without touching it. Exhale as you extend. Your lower back must not lift off the floor at any point during this movement.
Step 3: Return and repeat
Slowly bring both limbs back to the starting position. Repeat on the other side: left arm and right leg. That’s one rep.
Step 4: Breathing and tempo
Breathe slowly and deeply. Exhale as you extend the limbs, inhale as you return. Draw your navel toward your spine throughout the entire exercise. Each rep should take 3 to 4 seconds: slow, controlled, deliberate.
Programming:
- Beginner: 2-3 sets of 6-8 reps per side, 2-3 times per week
- Intermediate: 3 sets of 8-10 reps per side
- Advanced: 3-4 sets of 10-12 reps per side, with slower tempo or added resistance
Common mistakes to avoid
Lower back lifting off the floor: This is the number one error. The moment your lower back arches and separates from the floor, your abs have disengaged and your spine is taking the load. Reduce your range of motion: don’t extend the limbs as far. The range of motion only increases when you can maintain a flat back throughout.
Going too fast: Speed kills the dead bug’s effectiveness. This exercise is about control, not cardio. Rushing through reps means momentum is doing the work instead of your muscles. Slow down. If 6 slow reps feels easy, you’re either going too fast or not engaging properly.
Releasing core tension: Watch your belly. If it puffs outward during the movement instead of staying drawn in, you’ve lost deep abdominal engagement. Imagine you’re trying to zip up a pair of tight jeans: keep that inward pull constant.
Holding your breath: Breath-holding is a reflexive mistake under tension. It increases intra-abdominal pressure in an uncontrolled way and limits the exercise’s effectiveness. Force yourself to exhale as you extend. The breath is part of the movement, not separate from it.
Complementary exercises
The dead bug works best as part of a balanced core training approach. Pair it with these exercises:
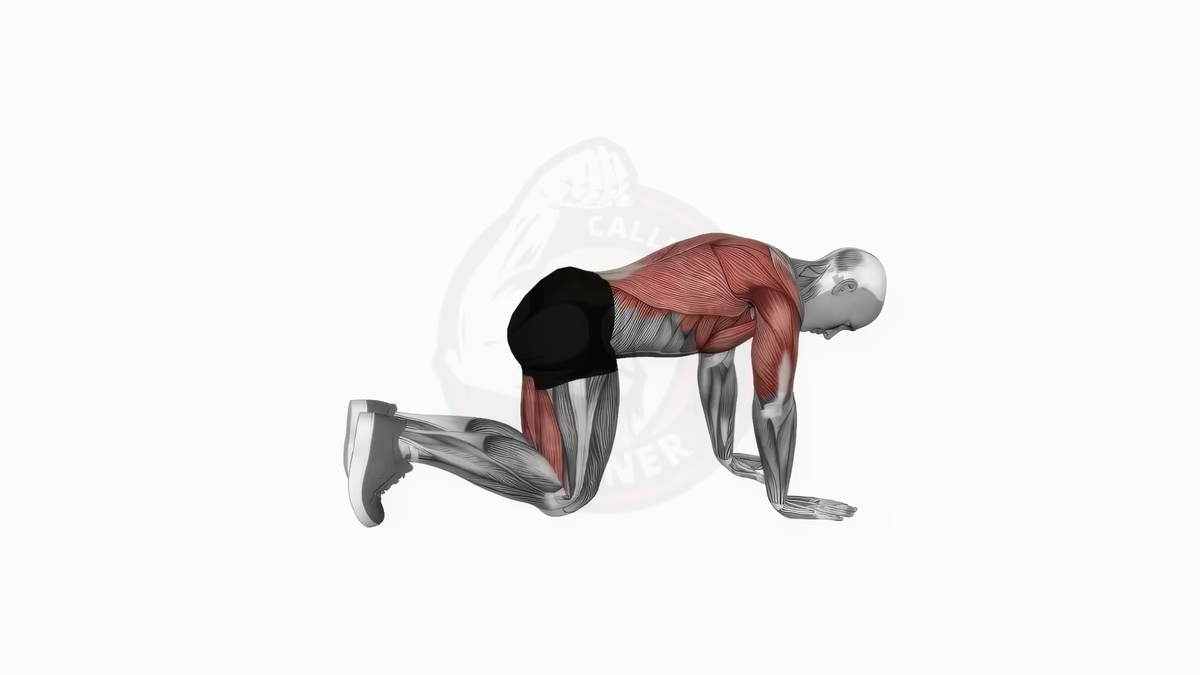
Bird dog: The bird dog mirrors the dead bug’s contralateral pattern but from a quadruped (all fours) position. Together, they train core stability from two different angles: supine and prone. If you can do both well, your core stability is solid.
Hollow hold: The hollow hold is a static exercise that targets the transverse abdominis intensely. Combine it with the dynamic nature of the dead bug for both endurance and movement control.
Plank: The plank builds core endurance in a prone position. Pairing it with the dead bug (supine) ensures you train your core from every angle.
Glute bridge: The dead bug focuses on the anterior core. The glute bridge complements it by strengthening the posterior chain: glutes, hamstrings and lower back. Together, they create balanced trunk strength.
How to integrate the dead bug into your training
As a warm-up (before any session):
- Dead bug: 1-2 sets x 6 reps per side
- Bird dog: 1-2 sets x 6 reps per side
- Cat-cow: 10 reps
This combination activates the deep core muscles and prepares your spine for the work ahead. Takes about 5 minutes.
In a core circuit:
- Dead bug: 3 sets x 8-10 reps per side
- Plank: 3 x 30 seconds
- Hollow hold: 3 x 20 seconds
- Bird dog: 3 x 8 reps per side
Rest 30 seconds between exercises. Complete the circuit 2-3 times. Total duration: 15-20 minutes.
On recovery or light days:
- Dead bug: 2-3 sets x 8 reps per side (slow tempo)
- Glute bridge: 2-3 sets x 10 reps
- Light stretching
The dead bug’s low-impact nature makes it perfect for active recovery days when you want to train without taxing your body.
What comes after the dead bug?
Once you can perform 3 sets of 12 reps per side with a slow, controlled tempo and your lower back stays glued to the floor, you’re ready to progress:
- Hollow hold: Takes the same deep abdominal engagement and applies it in a fully extended position. More demanding on the transverse abdominis and hip flexors.
- Plank and side plank: Build on the stability you’ve developed with longer isometric holds from different positions.
- Hanging knee raises: Bring your core strength to the pull-up bar. The spinal control you built with dead bugs transfers directly to controlled leg raises while hanging.
The dead bug may look simple. That’s its greatest strength. It teaches your core to do what it’s actually designed to do: stabilize your trunk while your limbs move freely. Master it, train it consistently, and every other exercise in your program will benefit.