Skills
How to learn the L-Sit
The L-sit (also called the "L-hold") is one of the most accessible calisthenics skills. It is within reach even if you are a beginner in calisthenics. However, accessible does not mean easy. The L-sit requires shoulder strength, hip flexor engagement and solid hamstring flexibility.

What makes the L-sit achievable yet challenging
The L-sit requires a certain level of fitness, especially: strength in the shoulders, triceps, hip flexors, and good hamstring flexibility.
To master it, you need to progress step by step, breaking the movement down. Exercises such as dip shrugs, pike compressions and hamstring stretches will help you get there.
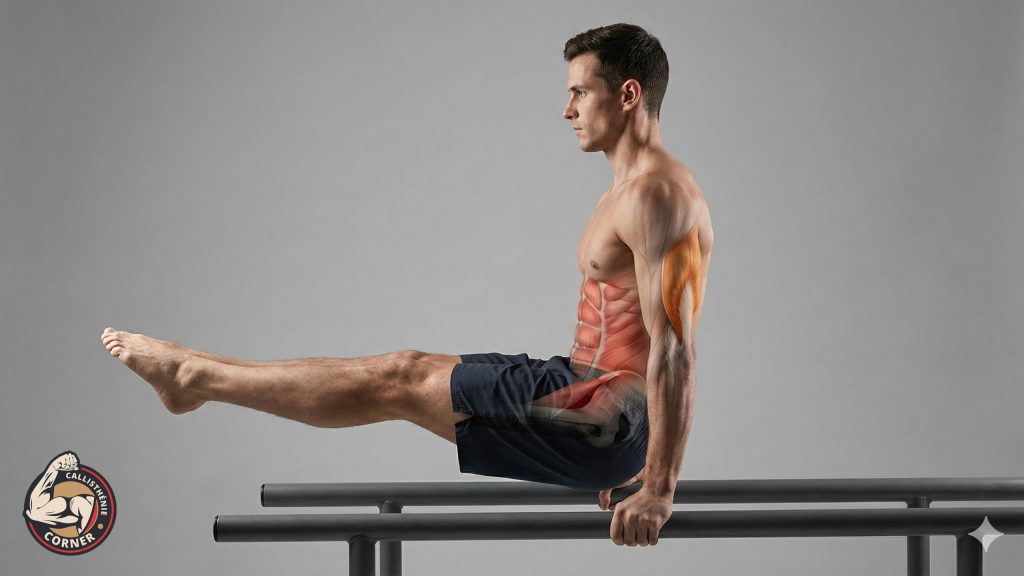
Muscles worked during the L-sit
The L-sit is a multi-joint movement that works several muscles simultaneously. Here is what you are training when you hold an L-sit:
| Muscle group | Function |
|---|---|
| Hip flexors (iliopsoas, rectus femoris) | Keeping the legs in the raised position |
| Abdominals | Trunk stabilisation and posterior pelvic tilt |
| Triceps | Elbow extension to keep the arms straight |
| Lower trapezius and pectoralis minor | Shoulder depression to lift the body off the ground |
| Quadriceps | Knee extension to keep the legs straight |
This is not an exhaustive list, but a summary of the most important muscles or those primarily engaged.
Preparation and warm-up before attempting the L-sit
Calisthenics in general requires a lot of preparation. For a skill like the L-sit, you can easily prepare yourself and at the same time gauge your abilities. Before diving into L-sit training, it is important to verify that you have these fundamental bases.
These prerequisites are simple but essential. They will spare you unnecessary frustration while ensuring you progress quickly and safely.
1. Arm and shoulder push strength
Push strength is essential. Your ability to support your bodyweight on your arms is paramount. If you have never worked on push movements before, holding the L-sit position will be more difficult. But even if that is your case, do not worry.
The recommended exercise: dip shrugs. They consist of elevating and lowering your shoulders while keeping your arms straight. This exercise is ideal for developing push strength.
It is like a muscle up: before doing one, you need to master pull-ups. Same for the L-sit: you need to already have the basics of dips.
Goal: develop the strength needed in the arms and shoulders to lift yourself off the ground.
Reps: 3 sets of 10 to 15 repetitions.
2. Hip compression
Hip compression is the most difficult point to master for most beginners. The hip flexion needed to keep your legs raised heavily recruits the hip flexors.
Recommended exercise: leg raises on parallel bars are perfect for strengthening this area. Make sure you do not use momentum and control the movement well.
Target: strengthen the hip flexors while controlling the movement.
Reps: 3 sets of 8 to 12 repetitions.
As an alternative, you can also try pike compressions. The exercise consists of sitting with legs straight, placing your hands on the floor and then lifting your legs upward. It sounds simple when described, but it is not exactly the case when you are starting out.
Target: work on hip flexion strength and improve compression.
Reps: 3 sets of 8 to 12 repetitions.
3. Hamstring flexibility
Flexibility is essential to perfect the L-sit. If you are too stiff, holding a perfect L-sit will be impossible. Flexibility in the legs, particularly in the hamstrings, must be worked on if you have not already.
For this, do regular hamstring stretches. You can achieve this by practising exercises like touching your toes with straight legs. You will become more flexible over time, without even realising it.
Goal: improve leg flexibility to avoid cramps and hold the position better.
Frequency: 2 to 3 times per week, outside of training days.
How to perform the L-sit correctly
The L-sit can be done directly on the floor, but this adds difficulty: you need very strong push strength and hip compression so your feet do not touch the ground.
For beginners or those who want to perfect their form without this constraint, parallettes are the ideal tool. They slightly elevate the body, which greatly facilitates learning while protecting the wrists.
Technique points for a perfect L-sit
1. The L formation
Your legs and torso must form a 90-degree angle. It is tempting to let your legs drop slightly due to the difficulty, but try to keep this angle as perfect as possible.
2. Shoulder depression
Maintaining the L while slightly depressing your shoulders is essential. By keeping your shoulders down, you activate the right muscles and avoid overloading your wrists. This is a detail often overlooked, but it makes all the difference.
3. Elbow and knee lock
For an elegant L-sit, your elbows must be completely straight and your knees locked. This gives a cleaner look, but requires more strength, especially to keep your legs in position.
4. Pointed toes
A detail that is more aesthetic than technical, but important. You can succeed at your L-sit without looking like it if you neglect the small details. Make sure to extend your ankles and point your toes forward for perfect leg alignment.
Progressions to unlock the L-sit
Two key stages before reaching the full L-sit: the Tuck L-sit and the Advanced Tuck L-sit. They allow you to strengthen the key muscles while working on technique.
Tuck L-sit
- Setup: get into a support position on parallel bars or hang from a high bar.
- Starting position: bring your knees towards your chest while keeping your back straight and arms extended.
- Hold: brace your abs and keep your knees close to your body, maintaining a stable position.
- Goal: hold the position for 10 to 15 seconds, then gradually increase the duration.
Advanced Tuck L-sit
- Setup: as with the Tuck L-sit, start in a support position on parallel bars or hanging from a high bar.
- Advanced position: bring your knees towards your chest, then move them slightly away from your body by starting to extend your legs.
- Hold: this time, your knees are no longer close to your torso, but pushed forward. Continue to brace your abs and keep your arms straight.
- Goal: hold the position for 10 to 15 seconds, extending your legs a little more each session.
Full L-sit
Once the Advanced Tuck is mastered, you can attempt the full L-sit:
- Position: arms straight, legs straight and horizontal, 90-degree angle between your torso and legs.
- Key points: shoulders down, elbows locked, knees locked, toes pointed.
- Beginner goal: hold for 5 to 10 seconds. Then aim for 15 seconds, 20 seconds, and finally 30 seconds.
How to hold the L-sit longer
Once you are capable of performing the L-sit, it is not always easy to break records right away. Do not get frustrated, work progressively.
To hold the L-sit longer, incorporate the position into your regular training. Repeat short sets while trying to maintain perfect form: shoulders depressed, legs straight and toes pointed forward.
As you strengthen your muscles and improve your technique, you will gradually see your hold time increase.
Practical tips to stay motivated
- Film yourself: record yourself regularly to observe your progress. You will quickly see subtle improvements in your leg position, stability and strength.
- Progress patiently: do not try to rush through stages. Master each phase before moving to the next one, and accept that some days will be harder than others.
- Recover sufficiently: do not forget to rest well. The muscles work hard during this type of isometric movement, and they need recovery to get stronger. Also include stretching to avoid unnecessary tension.
What comes after the L-sit?
You hold your L-sit for 15-20 seconds with clean form? Congratulations, you have the basics. Now you can aim for more demanding skills.
The L-sit is an essential foundation in calisthenics. Once mastered, it opens the doors to far more impressive skills.
Related guides: Parallettes, Handstand, Muscle Up, Push-ups, Hollow Hold.