Skills
How to learn the Handstand
You dream of doing a handstand, and it's a pretty impressive skill, let's be honest. But for beginners, a reality check: you won't nail a handstand in one or three months. For some it takes years, depending on training discipline. If you're determined, keep reading.
What is the handstand and why learn it?
The handstand, also called a hand balance or inverted hold, consists of holding your body vertical, supported on your hands, feet towards the sky.
On paper, it sounds simple. In reality, it's one of the most technical movements in calisthenics. Many attempt it, few succeed. Why? Because the handstand demands strength, balance and body control. All three at the same time.
Benefits of the handstand
- Full-body strengthening: The handstand works your shoulders, arms, back, abs and even your legs. It's a true full-body exercise.
- Balance and proprioception: You develop body awareness that few exercises can offer.
- Improved blood circulation: The inverted position promotes venous return to the heart.
- Intense focus: Impossible to think about anything else when you're balancing on your hands. It's almost meditative.
- Self-confidence: Overcoming the fear of inversion, then holding your first second in balance... it's a real victory.
Muscles worked during the handstand
Primary muscles:
- Deltoids (shoulders): They carry your entire bodyweight
- Triceps: Stabilise the arms in extension
- Core (abs, obliques, transverse): Maintain body alignment
Secondary muscles:
- Trapezius and pectorals: Assist shoulder stability
- Spinal erectors: Keep the back straight
- Wrist flexors/extensors: Handle the micro-adjustments for balance
Now that you know what you're getting into, let's see how to prepare your body before you start.
Prerequisites before starting the handstand
Before going head first (literally), your body needs to be ready. The handstand is not a beginner exercise. Without the basics of strength and mobility, you'll either get injured or stagnate for months.
Do you have the strength?
Many beginners want to learn the handstand when they haven't built their foundations yet. Result: wrist injuries, shoulder injuries, or giving up out of frustration.
Before attempting your first handstand, you must be able to:
- Do 15 strict push-ups with full range of motion
- Hold a front plank for 45 seconds
- Hold a hollow body for 30 seconds
- Do 5 clean pike push-ups
- Support your weight on your hands for 10 seconds without wrist pain
Work on your shoulder mobility
If your shoulders lack mobility, your handstand will always be misaligned. You'll compensate with your back, and hello pain.
Exercises to do 3-4 times per week:
- Shoulder rotations: Make circles with your arms, starting small and getting bigger. 10 in each direction.
- Wall slides: Back against the wall, arms in a "hold-up" position. Slide your arms up then back down, maintaining wall contact. 10 reps.
- Chest stretch: Place your arm against a doorframe, elbow at 90°. Rotate your torso in the opposite direction. Hold 30 seconds per side.
- Simple test: Lie on your back, arms extended overhead. If your arms don't touch the floor without arching your back, your mobility is insufficient.
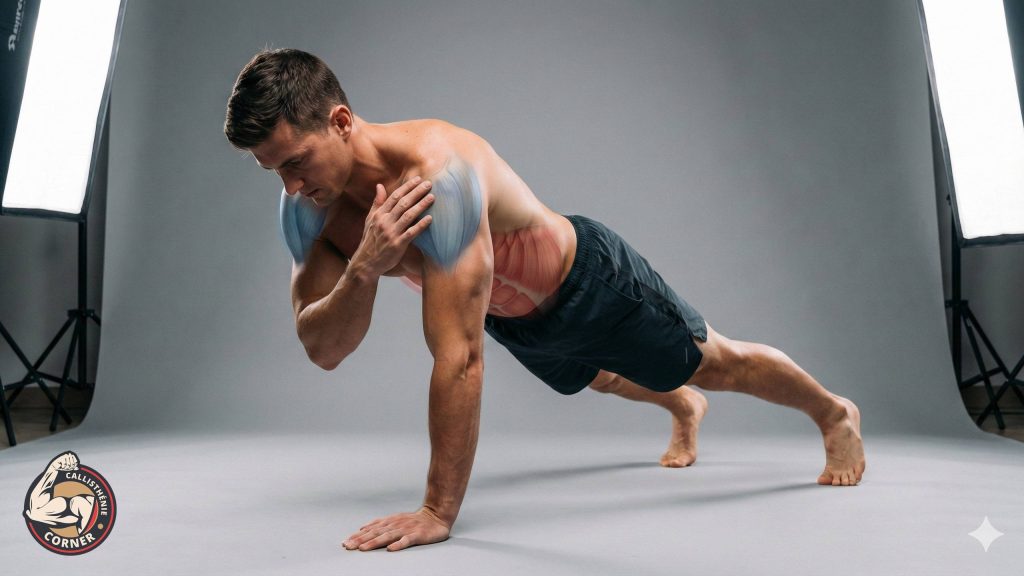
Core and wrist strengthening
Your core keeps your body aligned during the handstand. If it gives out, you collapse. Your wrists take your entire bodyweight and manage the micro-adjustments. If they're weak, you'll be in pain and won't hold.
For your core:
- Front plank: Push-up position, body braced from head to toe. Goal: 45 seconds.
- Side plank: On one elbow, body aligned. 30 seconds per side.
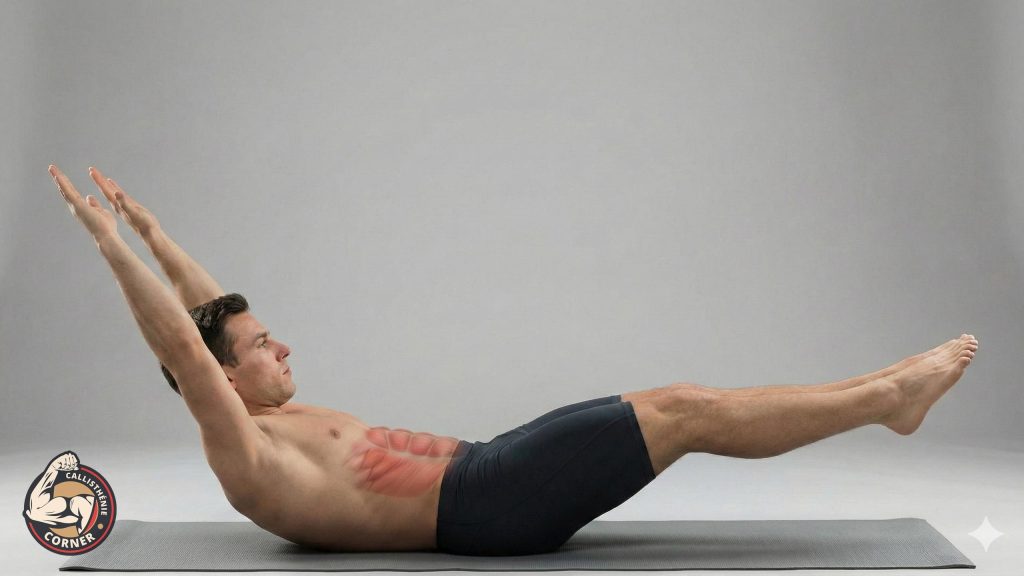
- Hollow body hold: Lying on your back, arms and legs slightly off the ground, lower back pressed to the floor. The king of handstand exercises. Goal: 30 seconds.
For your wrists:
- Rotations: Hands together, make slow circles with your wrists. 20 per direction.
- Floor extensions: On all fours, hands flat with fingers pointing towards you. Slowly shift your hips back to stretch. 30 seconds.
- Fingertip push-ups: Advanced, only if you have zero wrist pain. Strengthens the flexors.
How to overcome the fear of inversion
Fear of falling backward blocks more people than lack of strength. It's normal: your brain doesn't like being upside down. But you can work on it.
Get comfortable progressively:
- Start with the hollow body hold on the floor. Your body learns the position without the stress of inversion.
- Move to the wall handstand. The wall catches you, you can't fall. It's the best tool for desensitising your fear.
- Learn to exit the handstand safely. The cartwheel bail lets you escape without hurting yourself. Once you know how to exit, you're no longer afraid to enter.
- Use a thick mat or train on grass at first. Knowing the ground is "soft" frees you mentally.
- Breathe. Sounds obvious, but many hold their breath going up. Exhale on the way up, breathe normally in position.
How to learn the handstand step by step
You have the basics of strength and mobility. Now, time to get serious. Learning the handstand follows 5 progressive steps. Skipping steps = stagnation or injury. Respect the progression.
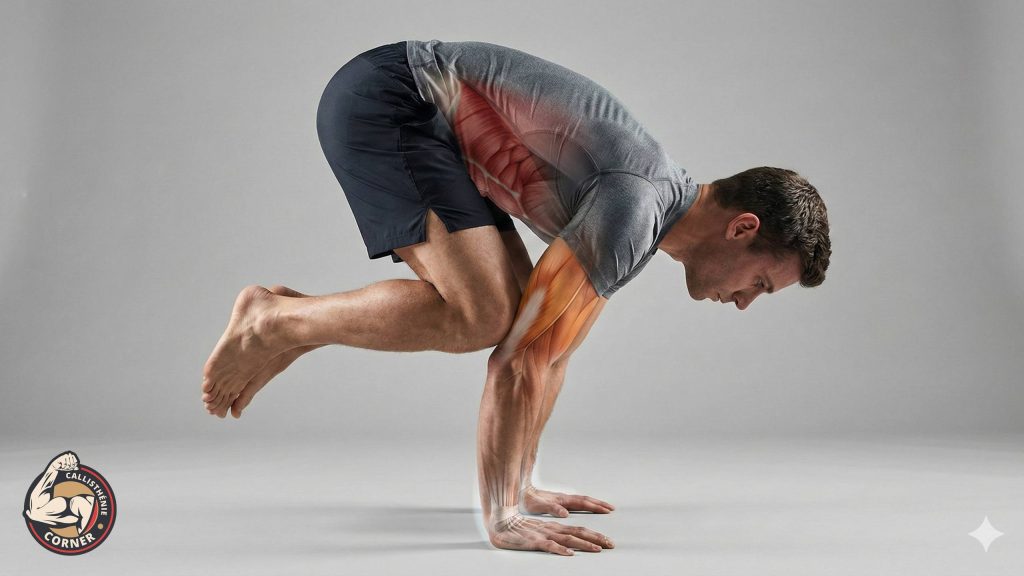
The frog stand (optional but recommended)
If you've never balanced on your hands, start here. The frog stand teaches you three essential things:
- Supporting your bodyweight on your hands
- Managing micro-adjustments with your fingers
- Overcoming the fear of tipping forward
Technique:
- Squat down, hands on the floor at shoulder width
- Place your knees on the back of your arms (triceps or elbows)
- Lean forward slowly
- Lift your feet off the ground and find balance
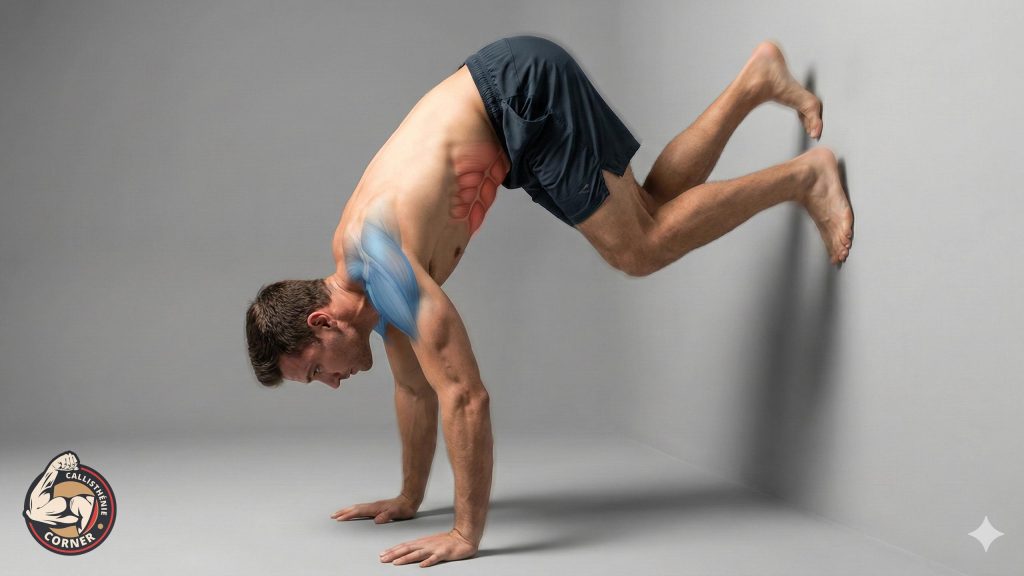
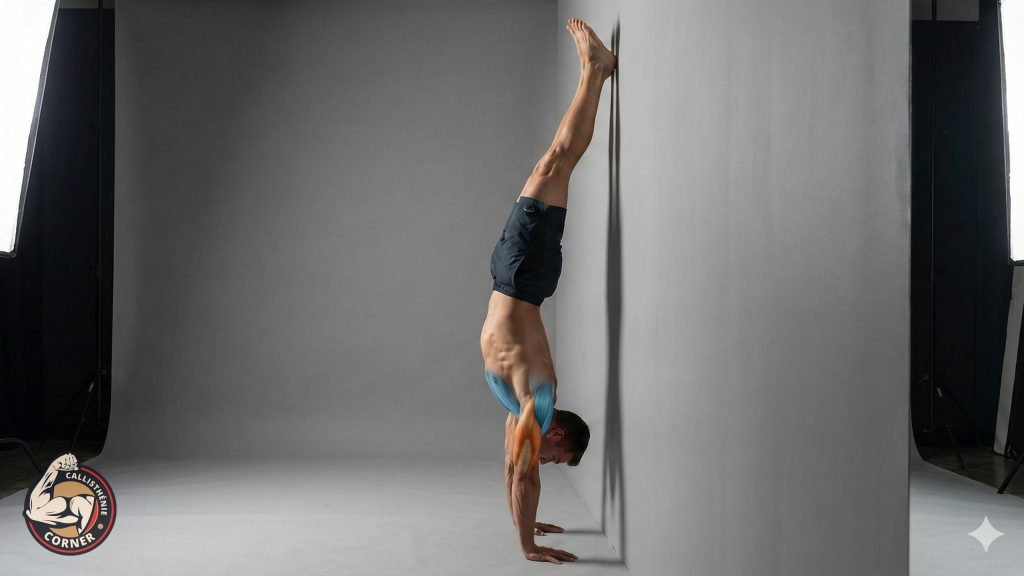
Wall handstand
The wall is your best ally. It lets you work on alignment and strength without managing balance. You'll spend weeks, even months here. Accept it.
Two variations to master:
Chest-to-wall: The best for learning. Start in plank position, feet against the wall. Walk your feet up while bringing your hands closer to the wall. Stop when your body is vertical, chest facing the wall.
Why this variation first? It forces good alignment. Impossible to arch your back or make the "banana" shape.
Back-to-wall: Hands on the floor 15-20 cm from the wall. Kick up to place your heels against the wall. Easier to get up, but watch out for bad alignment habits.
Goal before moving on: Hold 3 x 30 seconds in chest-to-wall with a well-aligned body (no banana).
Mastering the kick-up
The kick-up is the entry into the handstand. Many beginners struggle here because they're afraid of going up too hard. Result: they never go up enough.
Technique:
- Hands on the floor, shoulders directly above your wrists. Not forward, not back.
- Starting position: one leg bent in front (support leg), the other extended behind (launch leg).
- Swing the back leg towards the sky. At the same time, push hard off the front leg.
- Join both legs at the top.
The classic mistake: Being afraid and not kicking hard enough. You end up halfway and come back down.
The rule: Better to kick too hard (the wall catches you) than not hard enough. Practise against the wall until the movement is fluid and natural.
Goal: 10 clean kick-ups in a row against the wall, without crashing or losing control.
Perfect alignment
The difference between a wobbly handstand and a solid one? Alignment. A perfectly aligned body requires less effort to maintain.
Keys to alignment:
- Push the floor. Imagine you want to push through the floor with your hands. Your shoulders rise, your body "grows taller." This is scapular elevation.
- Brace your core. Pull your belly button in, contract your abs. As if you're about to take a punch.
- Squeeze your glutes. This locks your pelvis and prevents arching.
- Extend your legs, point your toes. Every part of your body must be active, down to your toes.
- Look between your hands. Not at your feet, not ahead. Between your hands. This aligns your neck with the rest of your spine.
- Error #1: the "banana handstand." Arched back, legs drifting forward. It happens when the core gives out or shoulders aren't open enough. Solution: more hollow body holds and more chest-to-wall.
The test: Film yourself from the side. Hands, shoulders, hips and ankles should form a straight line.
Micro-adjustments
A handstand is never still. Even the pros make constant micro-adjustments. Balance is a permanent correction, not a fixed position.
How it works:
Your hands are your balancing tool. Think of them like your feet when you're standing.
- Tipping towards your back (over-balance)? Press hard into your fingers to "catch" yourself forward.
- Tipping towards your chest (under-balance)? Push through your palms to push yourself back.
- Visualise: Your fingers are the brake, your palms are the accelerator.
Key exercise, the "toe pull": In a wall handstand, slightly lift your feet off the wall. Try to hold 2-3 seconds without touching. Rest. Repeat. This is where you learn to feel balance.
Goal: Hold 5-10 seconds off the wall, multiple times per session.
The freestanding handstand
You can hold 30 seconds against the wall with good alignment. You can lift your feet off for a few seconds. Now, time for the freestanding handstand.
The progression:
Stage A: Kick-up with wall backup. Position yourself 30-50 cm from the wall. Kick up. The goal: DON'T touch the wall. But if you need to catch yourself, it's there. This removes the fear.
Stage B: Kick-up without wall (with exit). Find an open space (or grass). Kick up and hold what you can. 1 second, 2 seconds... doesn't matter. Learn to exit cleanly (cartwheel or controlled return).
Stage C: Time accumulation. Don't try to hold 30 seconds straight. Do "attempts": go up, hold 3-5 seconds, come down. Repeat 10, 20, 30 times per session. Volume matters more than the duration of a single try.
The mindset: The freestanding handstand takes time. A lot of time. You'll fall hundreds of times. That's normal. Each fall teaches you something. Stay patient and consistent.
Realistic goal: Hold 5-10 seconds consistently. Once you can do that, aim for 30 seconds, then 1 minute.
Handstand training program
Warm-up routine (5-10 minutes)
Every handstand session starts with this warm-up. No exceptions. Your wrists and shoulders are going to take a beating, prepare them.
1. Wrists (2 minutes)
- Rotations in both directions: 20 per direction
- On all fours, hands flat, make circles with your body: 10 per direction
- Hands flat with fingers pointing towards you, slowly shift hips back: 30 seconds
2. Shoulders (2 minutes)
- Arm rotations with straight arms: 10 per direction
- Wall slides (back to wall, arms in "hold-up" going up and down): 10 reps
- High plank with scapular elevation (push the floor, round your upper back): 20 seconds
3. Activation (2-3 minutes)
- Down dog to plank: 10 reps (alternating between downward dog and plank)
- Wall walks: 3 to 5 slow, controlled ascents
- Hollow body hold: 20 seconds to activate the core
Total time: 6-7 minutes. This is non-negotiable.
Strengthening exercises
These exercises target exactly what you need for the handstand. Include them in your routine 2-3 times per week.
1. Hollow body hold: the fundamental
Lying on your back, arms extended behind your head, legs extended. Slightly lift your arms, shoulders and legs off the ground. Lower back glued to the floor.
This is THE handstand position, but horizontal. If you do only one strengthening exercise, make it this one.
Goal: 3 x 30-45 seconds
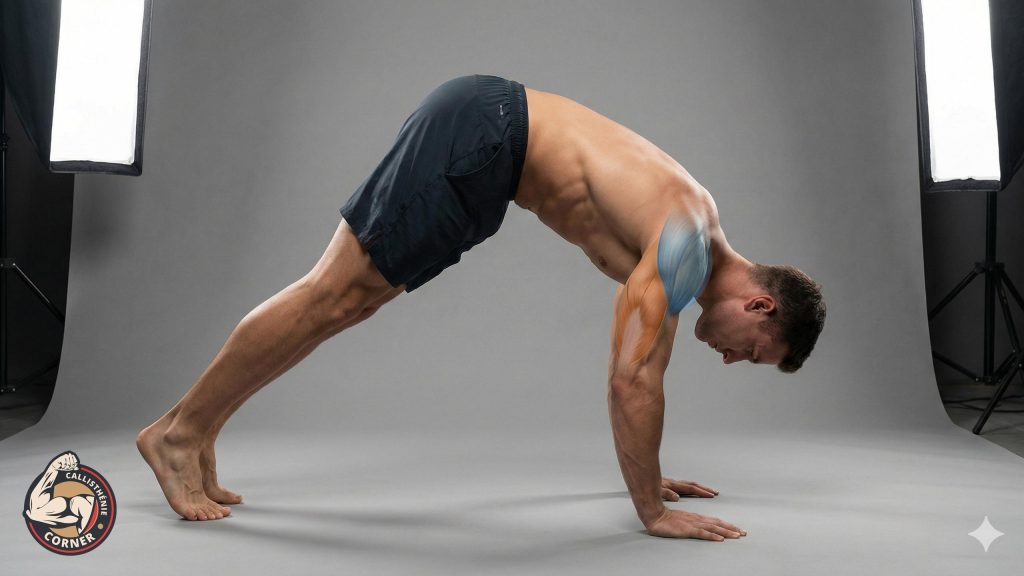
2. Wall walks: strength and control
Start in plank, feet against the wall. Walk your feet up while bringing your hands closer to the wall. Come back down the same way, slowly.
Goal: 3 x 5 controlled ascents/descents
3. Pike push-ups: shoulder strength
A-frame (pike) position, hands and feet on the floor, hips towards the sky. Bend your arms to lower your head towards the floor, then push back up.
The closer your feet are to your hands (or elevated), the harder it gets.
Goal: 3 x 8-12 reps
4. Shoulder taps in plank: stability
In a high plank, touch your left shoulder with your right hand. Return. Touch your right shoulder with your left hand. The goal: zero hip rotation.
Goal: 3 x 10 per side
5. Handstand holds (wall): direct practice
Nothing replaces time spent upside down. Accumulate volume against the wall.
Goal: 5-10 minutes of total inverted time per session (across multiple sets)
Weekly training schedule
Here's a 3-day per week schedule. Each session lasts 20-30 minutes.
| DAY 1: Strength | |
|---|---|
| Warm-up | 7 min |
| Pike push-ups | 3 x 8-12 |
| Wall walks | 3 x 5 |
| Hollow body hold | 3 x 30 sec |
| Shoulder taps | 3 x 10/side |
| DAY 2: Handstand practice | |
|---|---|
| Warm-up | 7 min |
| Chest-to-wall holds | 5 x 30-45 sec |
| Kick-up practice (against wall) | 10-15 attempts |
| Toe pulls (lifting off wall) | 10 attempts |
| Hollow body hold | 2 x 30 sec |
| DAY 3: Mixed | |
|---|---|
| Warm-up | 7 min |
| Wall walks | 3 x 5 |
| Pike push-ups | 3 x 8-12 |
| Freestanding attempts | 10-15 tries |
| Alignment work (chest-to-wall, focus form) | 3 x 30 sec |
Important notes:
- Rest: 60-90 seconds between sets
- Consistency: 3 sessions per week minimum. Three 20-minute sessions beat one hour-long session
- Progression: When an exercise gets easy, increase time or reps before moving to a harder variation
- Listen to your body: Wrist or shoulder pain = rest. Never force a painful joint
What comes after the handstand?
You hold your freestanding handstand for 10-15 seconds consistently? Congratulations. You're among the few people who truly master this skill.
But the journey doesn't stop there. The handstand opens the door to even more impressive movements.
Each stage requires months, sometimes years. That's what makes calisthenics addictive: there's always a higher level to unlock.