
Why do scapular pull-ups?
The scapular pull-up is a vastly underestimated exercise. Everyone wants to do pull-ups, but nobody works the foundation: shoulder blade stability.
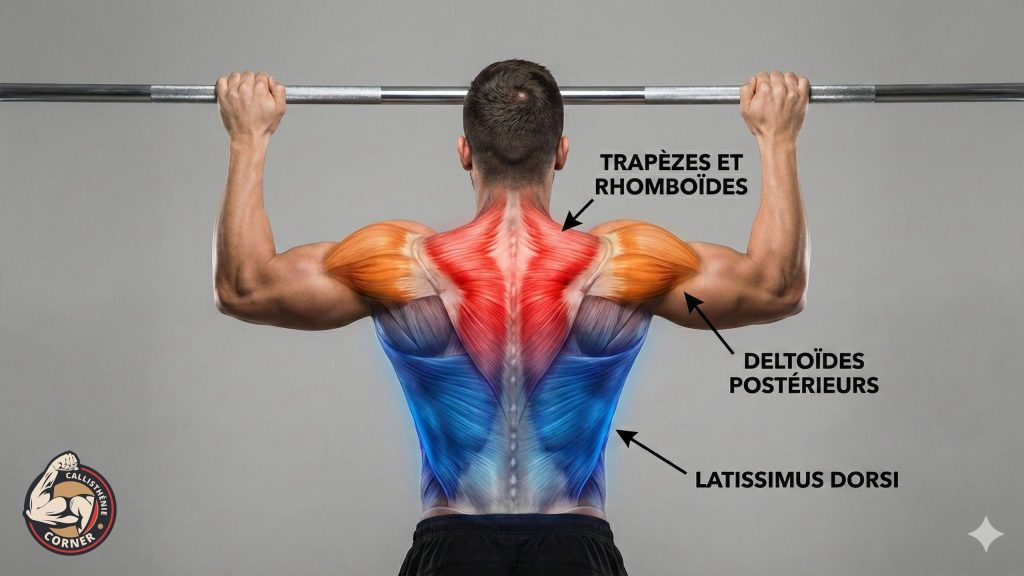
Yet it’s the starting movement of every pull-up. Before bending your elbows, you must first engage your trapezius, your rhomboids and your serratus anterior. Skip this step and your shoulders pay the price.
The scapular pull-up forces you to isolate this movement. You learn to control your shoulder blades with precision. The result: stronger shoulders, fewer injuries, and better muscle activation on all your pull-ups.
This exercise also improves your posture. The muscles that retract your shoulder blades are the same ones that fight desk-induced slouching. By strengthening them, you naturally straighten your upper body.
Strength prerequisites
The scapular pull-up is accessible to almost everyone. Even if you can’t do full pull-ups yet, you can start this exercise.
Hanging capacity: You must be able to hang from a bar in a pronated grip (palms facing forward) for at least 30 seconds. Arms fully extended, body relaxed. If you can’t hold 30 seconds, work on your grip strength first.

Shoulder mobility: In the hanging position, your shoulders should not feel stiff or painful. If you experience discomfort, work on your mobility before forcing the movement.
Self-assessment test: Hang from the bar. Try to lower your shoulders by a few centimeters without bending your elbows. If you feel your shoulder blades move and your torso rise slightly toward the bar, you’re ready.
How to do the scapular pull-up: step-by-step technique
The technique looks simple but is difficult to execute correctly.
Starting position:
Hang from a pull-up bar with a pronated grip (palms forward), hands shoulder-width apart. Your arms are completely straight. Your body hangs naturally, shoulders pulled up toward your ears. This is called the dead hang (passive hang) position.
Contract your abs and glutes lightly to keep your body stable. No swinging.
Retraction phase: lowering the shoulder blades
Without bending your elbows, pull your shoulders down and back. Imagine stuffing your shoulder blades into your back pockets. Your torso rises only a few centimeters (5 to 10 cm maximum).
You transition from passive hang to active hang. Your trapezius and rhomboids contract to depress the shoulder blades. Your arms stay straight the entire time.
Hold this top position for 1 to 2 seconds, voluntarily contracting your back muscles.
Controlled release phase
Gently release the movement to return to the starting position. Don’t drop suddenly. The return must be as controlled as the ascent.
Breathing
Inhale in the bottom position (dead hang). Exhale while retracting the shoulder blades (active hang). Breathing helps stabilize your torso.
Critical technique points
The range of motion is minimal. This is not a pull-up. If you rise more than 10 cm, you’re starting to bend your elbows and turning the movement into a half pull-up. The goal is to isolate shoulder blade work.
Focus on the sensation in your upper back. You should feel your middle and lower trapezius working, not your arms.
Mistakes to avoid
Bending the elbows:
As soon as the exercise gets hard, the reflex is to slightly bend the elbows. Bad idea. You turn the scapular pull-up into a half pull-up and lose the entire point of the movement. Your arms must stay locked in full extension from start to finish. If you can’t keep your arms straight, reduce the number of reps or use a resistance band for assistance.
Shrugging shoulders instead of depressing them:
Some practitioners shrug their shoulders toward their ears instead of pulling them down. That’s the opposite of the intended movement. You need to create space between your shoulders and ears, not bring them closer. Think “shoulders toward back pockets,” not “shoulders toward chin.”
Using momentum:
Swinging or using a hip thrust to get up is cheating. The scapular pull-up is an exercise of strict control. Every rep should be slow and deliberate. If you use momentum, you’re not building the stability you need to progress.
Completely releasing at the bottom:
When returning to dead hang, some people completely release their shoulders to the point of losing all tension. Always maintain a minimum of muscular engagement, even at the bottom. Your shoulders should never be “dead” to the point of creating excessive pull on your ligaments.
Forgetting core engagement:
Your body must remain aligned and stable. If your pelvis swings forward or your back arches excessively, you lose movement effectiveness. Contract your abs and glutes to maintain a vertical plank position.
Variations and progressions
Once you’ve mastered the standard scapular pull-up, here’s how to increase difficulty.
Band-assisted scapular pull-up
If you’re starting out and the movement is too difficult, attach a resistance band to the bar. Place a foot or knee in the band to reduce the load. You can also start with Australian pull-ups (inverted rows) to build strength.
Slow tempo scapular pull-up
Slow the movement further: 3 seconds up, 2 seconds pause at the top, 3 seconds down. Slow tempo maximizes time under tension and strengthens the small stabilizer muscles.
Extended hold scapular pull-up
Hold the top position for 5 to 10 seconds before lowering. This variation is brutal for your trapezius and rhomboids. It improves the muscular endurance of your shoulder blades.
Supinated grip scapular pull-up
Switch your grip: palms toward you instead of palms forward. The mechanics stay the same, but the muscle activation angle changes slightly. Alternate between different grip types for complete development.
Daily practice integration
Do 2-3 sets of scapular pull-ups every day, even on rest days. It’s an excellent way to maintain shoulder mobility and strength without excessive fatigue. Ideal if you have a pull-up bar at home.
What comes after the scapular pull-up?
Toward full pull-ups
The scapular pull-up is the first phase of every pull-up. Now that you know how to engage your shoulder blades correctly, your pull-ups will be cleaner and more powerful. Start each pull-up with a scapular pull-up, then bend your elbows to rise. Your pulling strength will explode.
Toward the muscle-up
The muscle-up demands total shoulder blade control during the transition phase. The scapular pull-up directly prepares you for this requirement. Without this foundation, the muscle-up remains inaccessible.
Toward the front lever
The front lever and all its progressions (tuck, straddle, full) require constant scapular depression. The scapular pull-up strengthens exactly this motor pattern. It’s an indispensable preparatory exercise for all back tension skills.
Permanent integration
Even when you can do 20 pull-ups in a row, keep scapular pull-ups in your warm-up. 2 sets of 10 reps before every pulling session activate your stabilizer muscles and prevent injuries. It’s health insurance for your shoulders.
The scapular pull-up isn’t an exercise you master then abandon. It’s a fundamental movement you integrate into your practice permanently.